Who goes there? Authn & Authz
Introduction
Every day, we live a significant portion of our lives online. We shop, bank, work, and connect with others, all through digital applications. But how do these apps know it’s really you accessing your bank account? And once you’re in, how do they ensure you can’t see someone else’s private messages or financial data?
The goal of this post is to pull back the curtain on digital identity and access. We hope this article provides a deeper understanding of the key technologies that make modern, secure access possible.
Authentication and Authorisation
Before we dive deep, it’s crucial to understand the two foundational pillars of access control. They sound similar, but they do very different jobs.
Think about going to the airport to catch a flight. Your journey through security involves both authentication and authorization.
- Authentication: “Are you who you claim to be?”
When you get to the security checkpoint, you hand over your boarding pass and your passport. The agent checks that the name on your ticket matches your ID and that your face matches the photo. You have just been authenticated. The system has verified your identity. - Authorization: “What are you allowed to do?” Now that they know who you are, what does your boarding pass permit you to do? It authorizes you to go through security, proceed to a specific gate, and board a specific plane. It does not authorize you to walk into the cockpit or access the air traffic control tower. Your permissions are clearly defined.
In the digital world, it’s the exact same principle. Authentication confirms your identity; authorization determines your permissions.
Understanding the technology
Instead of just talking about theory, let’s walk through the process of developing a simple application from the ground up. As we consider the growth and evolution of applications, we’ll introduce core security concepts. We’ll also consider some real-world analogies to break everything down, demystifying ideas like SSO, OAuth 2.0, and JWTs along the way.
A simple Web Application
Analogy: The One-Story Corporate Office
Imagine a small, single-story corporate office where everyone enters through the front desk. When you arrive, you show your ID to the receptionist. Once verified, the receptionist makes an entry for you in the ledger, and you’re handed a visitor badge. For the rest of the day, you can move around the office freely by just flashing your badge to any security personnel. Everything — identity verification, badge issuance, and access checks — happens right at that front desk. It’s centralized, efficient, and works smoothly for a small office.
Application: A Monolith
Similar to the one-story office, our web application is a self-contained unit where the user-facing front end and the back-end logic all live together. We need to let users create an account and log in, and the most traditional way to do this is with a username and password.
How it works: Classic Username, Password, and Cookie
A user enters their username and password (think: showing your ID) into a login form. The server checks these credentials against a list of users stored in its database. If the credentials are correct, the server needs a way to remember that this user is logged in for future requests. It does this by creating a session (think: adding an entry in the ledger). Think of a session as a temporary file with a unique SessionID on the server that stores information about the logged-in user.
The server then gives the user’s browser a small piece of data called a cookie (think: visitor badge), which contains the unique SessionID.
From then on, for every request the user makes (like clicking on a new page), the browser automatically sends this cookie back to the server. The server uses the Session ID from the cookie to look up the user’s session data and confirm they are authenticated.
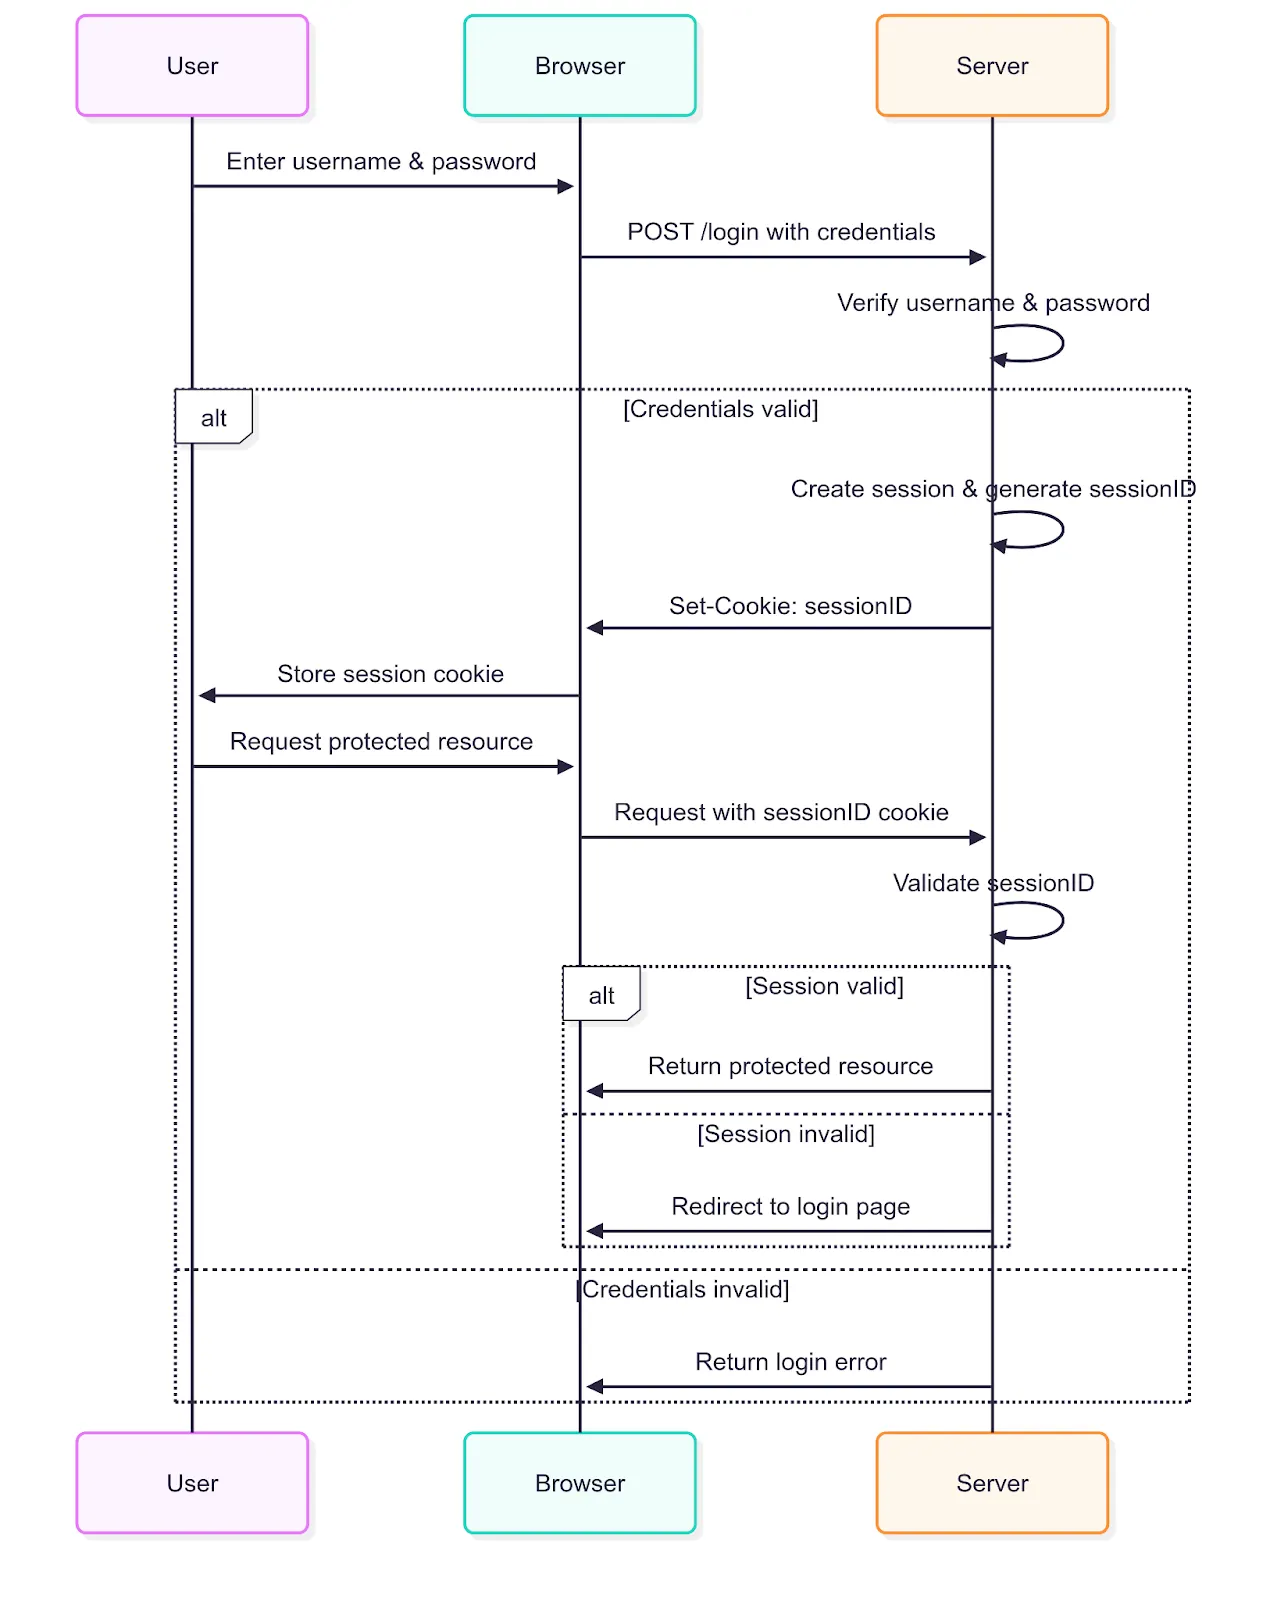
Username/Password Authentication Flow
For many projects, this is a great way to start. Its main benefit is simplicity. All the logic is in one place, making it straightforward to build, deploy, and maintain.
The Application Grows
Analogy: The Skyscraper Upgrade
The company grows into a massive skyscraper, with different departments spread across multiple floors. Suddenly, the single receptionist on the ground floor can’t manage access for everyone. Each floor has its own security desk.
Our system of a visitor badge issued by a receptionist at the ground floor gets overwhelmed and starts to fall through. Let’s dive a bit deep and try to understand our problems:
- How does the security on the 12th floor know that a visitor badge issued on the ground floor is legitimate? Ledger is present only at the ground-floor reception. The security desk on every floor now needs to call the ground floor receptionist to verify each visitor badge. The entire building’s operations bottleneck at the receptionist.
- How does each floor’s security agree on what a visitor badge allows one to do? Someone with a badge might be welcomed into the executive lounge on the 15th floor, but stopped by security on the 18th.
To fix the chaos of our uncoordinated office, we need to completely rethink our access system. Simple visitor badges issued at random desks won’t cut it anymore.
The Photo ID Badge and Keycard
We introduce a proper credentialing system, managed by a central security office. Here’s how it works:
- Photo ID Badge: You first check in at the central security office, where you prove who you are. In return, you’re issued an official photo ID badge. This badge says, “This is Jane Doe, a verified employee.” Its purpose is to prove your identity — not to open doors.
- Keycard: To access specific areas — like the 18th floor server room — you use your photo ID to request a keycard. The security office checks your role, confirms you’re authorized, and issues a keycard encoded for that access. Door scanners throughout the building can validate the keycard on their own, without contacting the central office.
Application: Microservice Architecture
Now let’s apply this analogy to our application. Our simple application is a hit. To handle the massive increase in traffic, we’ve broken our all-in-one monolith into smaller, independent parts. This is a microservices architecture (think: multiple floors). Instead of one giant server doing everything, we have separate services for user profiles, billing, comments, and so on.
The old username/password and session cookie method starts to break down in this new, distributed world:
- Previously, our stateful server tracked user sessions. In a microservices setup, this requires all services to query a central session store like Redis (think: calling the receptionist) — adding latency, complexity, and introducing a single point of failure.
- Authorization adds further complexity. Each service (e.g., comments, billing) needs user role info (like “admin”), leading to duplicated logic or tight coupling between services just to make access decisions.
It’s clear that to truly support our application’s growth, we need a better approach — one that is stateless, scalable, and designed for a distributed environment.
How it works: Token-Based Auth
Instead of relying on server-side session state, the user’s identity and permissions are securely encoded in tokens. So, when a user logs in, an IdP+Auth server (think: central security office) issues the application two types of tokens, often in the JSON Web Token (JWT) format.
- An ID Token (think: the photo ID badge) provides proof of authentication. It contains information about who the user is.
- An Access Token (think: the keycard) is what the application uses to access specific resources, like an API. It represents the authorization to perform an action.
These tokens are then included in subsequent requests, allowing services to independently validate the tokens and authorize actions.
This model is powered by two key standards:
- OAuth 2.0: A widely adopted framework for authorization. It enables applications to request access tokens that grant limited rights to user resources — without handling user credentials directly.
- OpenID Connect (OIDC): An identity layer built on top of OAuth 2.0. It introduces the ID Token to support authentication, enabling applications to verify who the user is in a secure and standardized way.
OAuth 2.0 supports several authorization flows, each suited to different application types and trust levels. Common flows include:
- Authorization Code Flow — used by web and mobile apps that can securely store secrets
- Client Credentials Flow — for machine-to-machine communication without user interaction
- Implicit Flow — deprecated, originally used for single-page applications
- Resource Owner Password Credentials Flow — legacy, not recommended for new applications
The following diagram illustrates the Authorization Code Flow, which is the most commonly used and secure flow for user-facing applications.
Oauth 2.0 — Authorization Code Flow
How it works: JWT
Let’s take a deeper look into the internals of the token standard, i.e. JWT, that enables this entire mechanism. JSON Web Tokens, or JWTs, are a compact and verifiable way of transferring information between two parties.
A JWT consists of three parts, each encoded in Base64Url and separated by dots (.):
- Header:
Contains metadata about the token, including the signing algorithm (e.g., HS256, RS256) and token type (JWT). - Payload:
Contains the claims — statements about an entity (usually the user) and additional data. Common claims include:
- sub (subject): the user identifier
- iss (issuer): the token issuer
- exp (expiration time): token expiry timestamp
- aud (audience): intended recipients
- Custom claims such as user roles or permissions - Note that anyone can see these fields, so the payload should not contain sensitive information.
- Signature:
Created by signing the encoded header and payload with a secret key or private key. The signature ensures the token’s integrity and authenticity.
The signature can be validated with the help of the public key of the identity provider accessible via the JWKS endpoint.
The following sequence diagram shows how JWT enables secure and independent validation at each resource server.
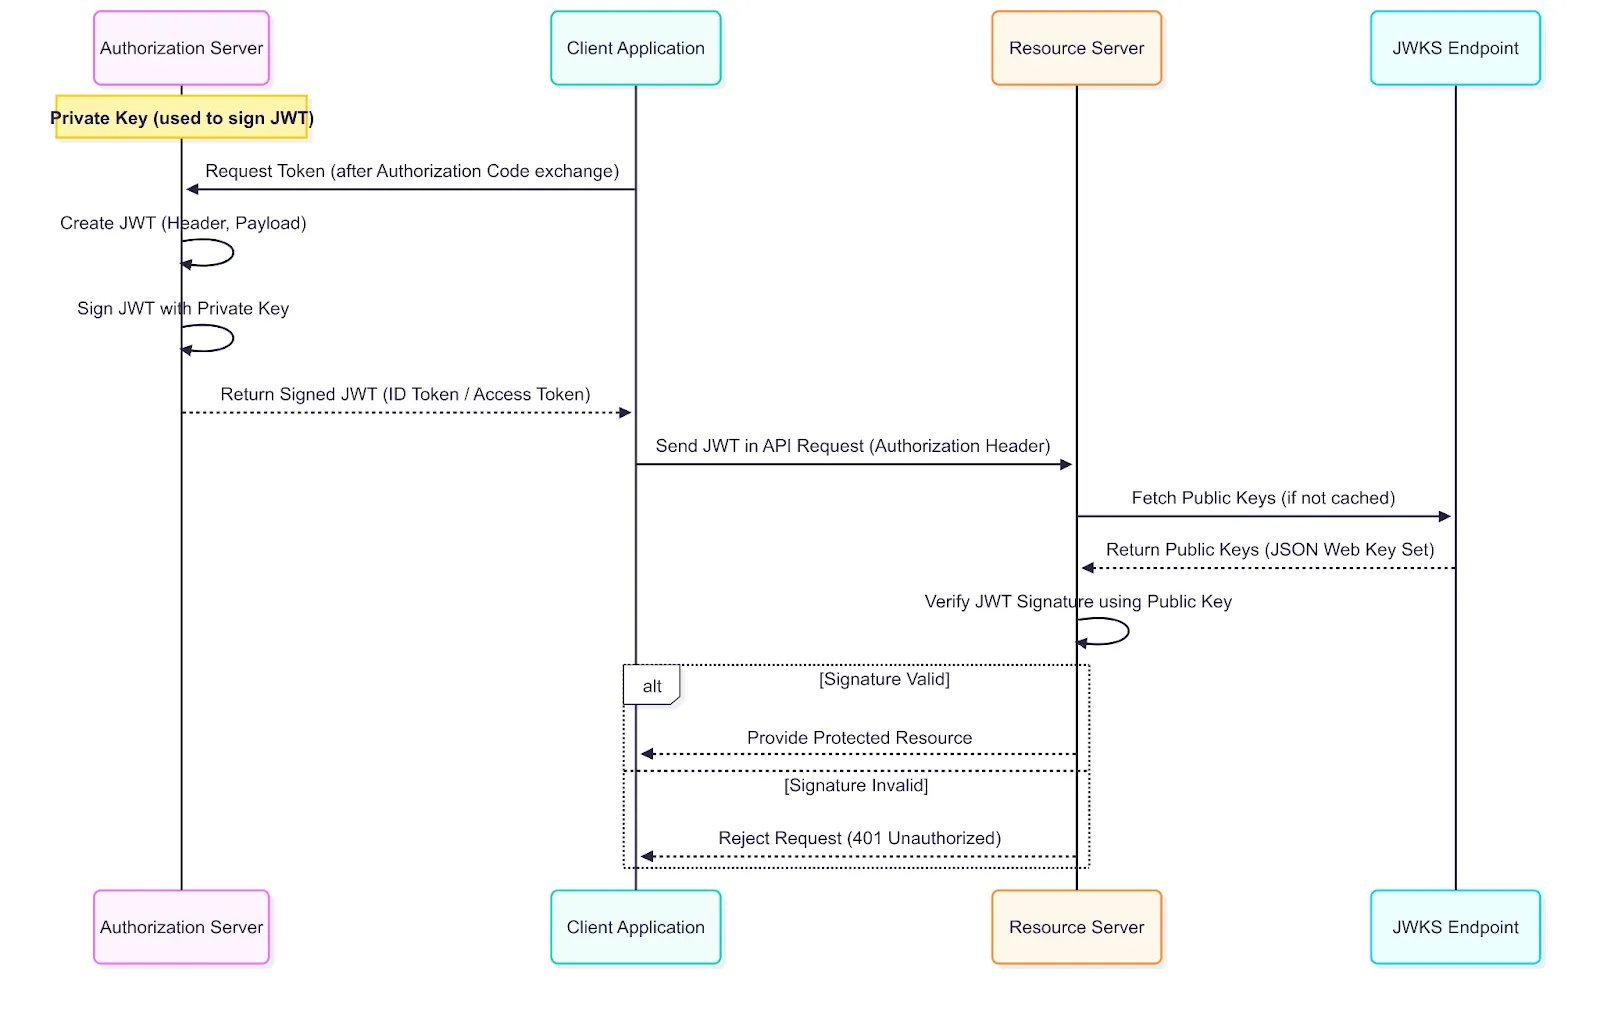
JWT Validation
So by leveraging an auth server to issue independently verifiable JWT tokens, we solve the problems with our microservice architecture as follows:
- Scalability:
Services validate tokens locally by checking the digital signature, avoiding calls to a central server and improving scalability. - Centralized Authorization:
Access Tokens embed permissions (“scopes”), letting services like “comments” and “billing” independently understand user roles from the same token. - Enhanced Security:
Digital signatures prevent token tampering. Services trust token data by verifying its signature cryptographically without needing central validation.
Thus, this token-based approach provides a scalable, secure, and flexible auth for our growing application needs.
One Login to Rule Them All: Single Sign-On (SSO)
Analogy: Access to a cafeteria building
Imagine now the company adds a separate cafeteria located alongside the main office building. Right now, accessing the cafeteria requires a different badge and key card — an extra step that feels inconvenient and unnecessary.
Now, picture a simpler system: your office badge and key card issued by the central security office work at both buildings. No need to verify your identity all over again. Just one badge, one key card, and seamless access across multiple locations.
Application: Family of apps
Similar to our office expansion analogy, our application (think: main office) too is now part of a bigger family of apps. Maybe we’ve built a separate “Admin Panel” (think: cafeteria). It would be annoying for our users to have to log in to each of these applications separately. We want them to log in once and have access to everything.
How it works: Single Sign-On
Think of it like logging into Gmail: once you’re signed in, you don’t need to log in separately to other Google apps like Drive or Calendar. The Identity Provider manages a single authenticated session, enabling seamless access across multiple applications without repeated logins. Here’s how it works:
- The user logs in once to a central Identity Provider (IdP) (think: central security office).
- Later, the user tries to access another application within the same ecosystem (e.g., the Admin Panel).
- The Admin Panel detects that the user does not yet have an access token for it.
- Instead of prompting the user to log in again, it redirects them to the IdP.
- Since the user already has an active session with the IdP, it automatically issues a new token for the Admin Panel.
- The IdP then redirects the user back to the Admin Panel, now authenticated.
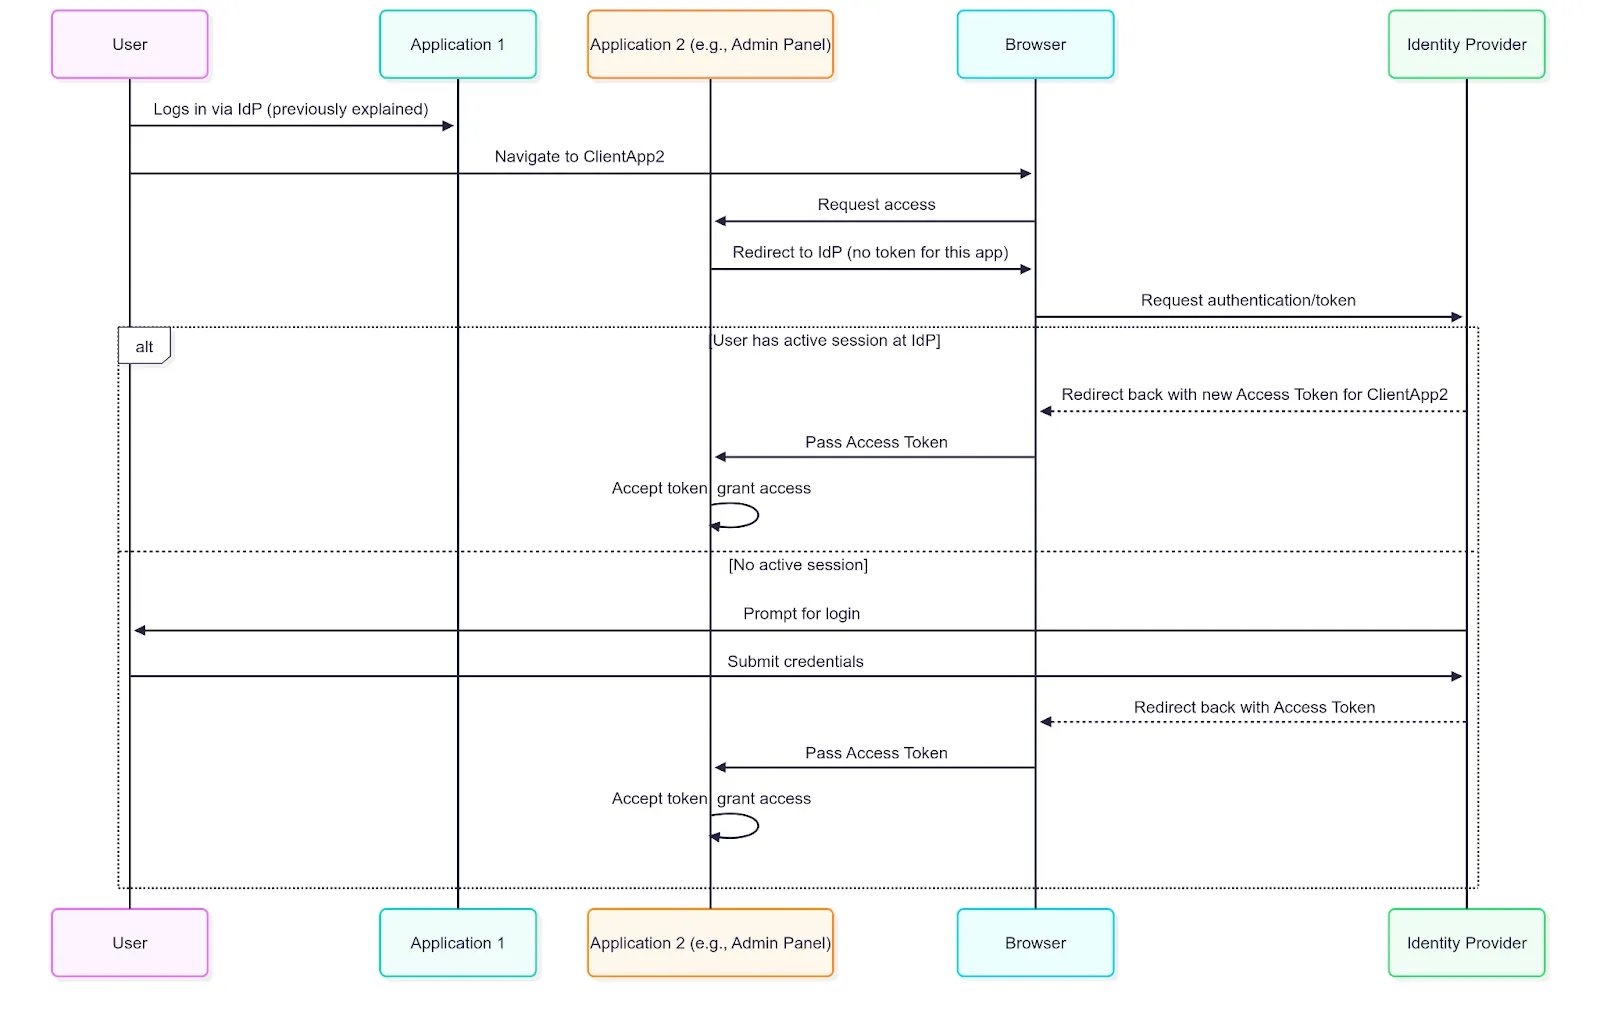
Single Sign On
The result is a frictionless experience. The user authenticates once and gains access to a whole suite of applications without ever having to re-enter their credentials.
Trusting Others — Federated Identity
Analogy: The Trusted Contractor Agreement
Our company has a partnership with a major, trusted vendor — let’s say Microsoft. They’ve established a formal agreement to recognise each other’s credentials.
One day, a contractor from Microsoft arrives at your office. Instead of going through the usual ID verification process, they head to a special security desk and present their official Microsoft badge. Your company’s security team doesn’t personally know this contractor, but they trust Microsoft.
Thanks to the pre-arranged agreement, the badge is verified as legitimate, and the contractor is issued a temporary visitor keycard for access. Your company didn’t issue the original badge — it simply trusted the credentials from a known and trusted partner.
Application: Login without creating a username and password
Our app is a huge success, but we’ve noticed something: many potential users drop off at the sign-up page. They don’t want to create and remember another username and password. How can we make it easier for them by letting them use an account they already have and trust?
How it works: Federated Identity
Federated Identity is essentially SSO across organizations. It lets users authenticate with one trusted IdP (think: the vendor), like Azure AD, and use that authentication to access applications managed by anot
her IdP (think: our office), like Okta, often referred to as a service provider. Instead of managing separate credentials for each system, users rely on their home organization’s credentials, while your application trusts the external IdP’s authentication.
Note: A trust must be established beforehand between your organization’s IdP and the third party’s IdP.
The following sequence diagram showcases how Federated SSO is used:
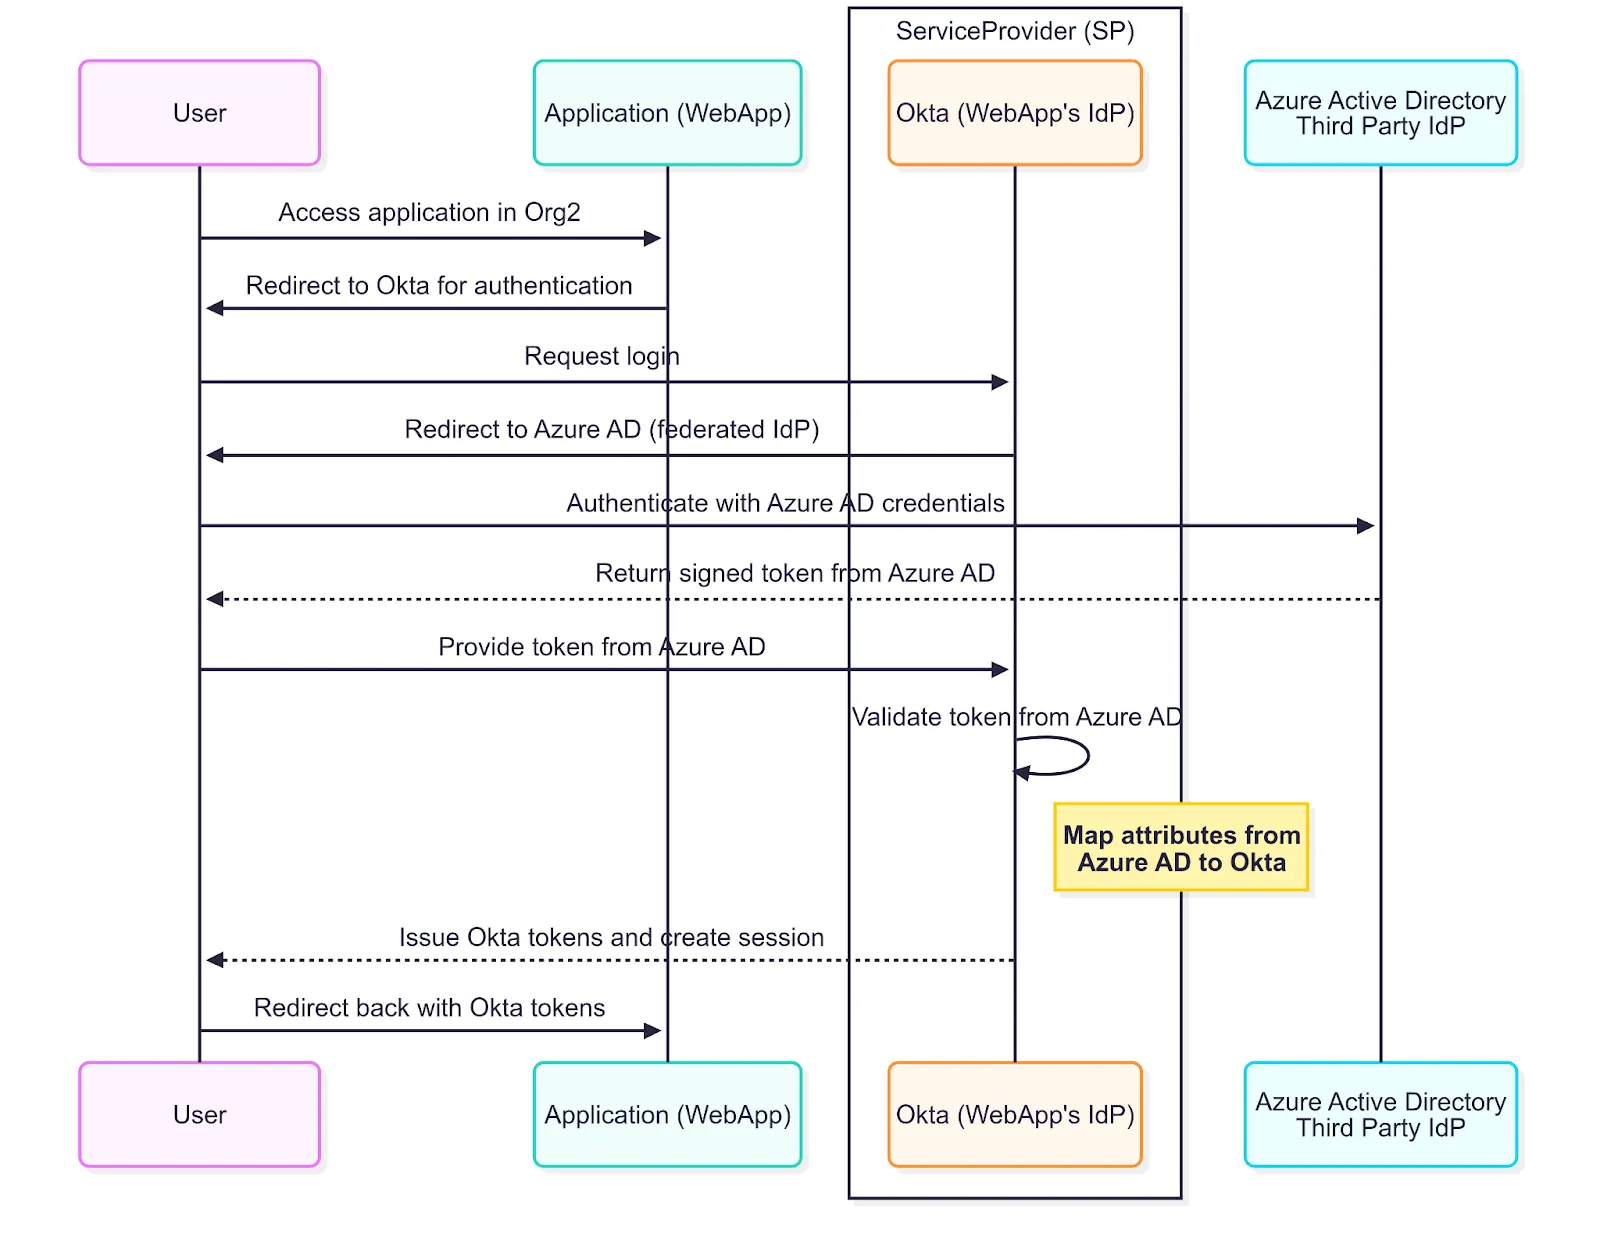
Federated SSO
One Token Doesn’t Fit All — Token Exchange
Analogy: The Temporary Access Code for Sensitive Areas
Inside the main office, there’s a high-security room managed by a separate internal team with stricter rules. An employee wants to enter the high security room, but their regular keycard isn’t authorized for direct access. So, they swipe their keycard at a secure terminal outside the room. The terminal contacts the Central Security Office and says, “This verified employee needs temporary access to the server room”. The terminal checks the employee’s credentials and issues a one-time, short-lived access code — a kind of special pass that works only for that server room and only for a limited time.
Application: Limited temporary access
One of our services, Service A (think: main office), often needs to call another, more specialised service, Service B (think: high security room), on the user’s behalf to complete a task. For security, we don’t want the second service to accept the same general-purpose token (regular keycard) as the first. We need a way to trade a broad token for a very specific token (think: short-lived access code). This is the Token Exchange pattern.
How it works: Token Exchange
Token Exchange (https://datatracker.ietf.org/doc/html/rfc8693) is an OAuth 2.0 extension that enables a client or service to exchange an existing token called the subject token for a new token with different scopes, audiences, or privileges. This exchange happens securely at the authorization server’s token endpoint without requiring the user to re-authenticate.
In practice, Service A sends its current access token to the authorization server, requesting a new token scoped specifically for Service B. The authorization server validates the original token, applies security policies, and issues a new, limited-scope token tailored for Service B.
Token Exchange supports many complex scenarios:
- Delegation (On-Behalf-Of Access)
For example, a frontend application with a user’s access token needs to call a backend API on behalf of that user. Instead of passing the original token, the frontend exchanges it for a new token scoped specifically for that API. This new token reflects the user’s identity and permissions but is limited to what API requires. - Impersonation
Unlike delegation, where the actor and subject identities are distinct, impersonation typically means the actor fully assumes the subject’s identity for the duration of the token’s validity. This is useful for administrative tasks or service accounts acting on behalf of users. - Token Translation
Converting tokens from one format to another (e.g., SAML assertion to JWT access token) so downstream services can understand and validate them. - Cross-Domain Access:
Exchanging a token issued by one authorization server or IdP in one security realm for a token issued by the IdP or authorization server in a completely different security realm.
Conclusion
From session cookies in simple applications to JWTs in distributed systems, identity and access are the invisible gates that shape every digital experience. What started as a username and password has evolved into a complex, resilient, and scalable dance of tokens, standards, and trust.
So the next time you’re magically signed into five apps with a single login, or wonder how third-party apps get just the right access — not too much, not too little — you’ll know: it’s not magic. It’s architecture.